Friday, December 25, 2015

Happy Holidays from Bubblegum Paper!

We wish you a Merry Christmas,
... and a CRAFT-FILLED NEW YEAR!

This year's 2015 Countdown to Christmas card series was jam-packed at the end, but I managed to finish it in time for the holidays.  I also created a video that showcases all 25 cards at a glance.

You can watch it here on YouTube, if the video below doesn't play properly.


Wishing you all the best in 2016!  Have a wonderful holiday and thanks for following my blog!

Happy Holidays!

2015 Countdown to Xmas: 25 Days, 25 Cards - Card #25

Merry Christmas everyone!  May your holiday be filled with joy, food, fun, family, friends and crafting!  Card #25 features none other than a Bubblegum Machine!  Last year my last card also featured a gumball machine from The Stamps of Life.  This year, I'm featuring the Lawn Fawn Sweet Smiles stamp set that came out earlier this year.


Materials:
  • White card base: 4.25"W x 11"H, scored at 5.5" mark
  • Patterned Paper: Taylored Expressions Rainbow Brights
  • Lawn Fawn: Sweet Smiles stamp set
  • Lawn Fawn: Joy to the Woods stamp set
  • Lawn Fawn: Scalloped Rectangle die set
  • Simon Says Stamp: Stitched Rectangle dies
  • Copic Markers
  • Memento Tuxedo Black Ink
  • Versamark Ink
  • Ranger Embossing Powder in Liquid Platinum
  • Wink of Stella Pen
Directions:
  • Die cut the scalloped rectangle tag and stitched rectangle dies from white card stock.
  • Cut a rectangle from patterned paper that is slightly larger than the scalloped rectangle.
  • Stamp the gumball machine with Memento Tuxedo Black ink; color with copic markers
  • Add Wink of Stella for a subtle glitter effect
  • Stamp the sentiment in Versamark ink and heat emboss.
  • Add all the layers together. 
Here is a close-up of the card:


Happy Holidays!

Thursday, December 24, 2015

2015 Countdown to Xmas: 25 Days, 25 Cards - Card #24

Day 24: The bunnies are back!  This time, I'm using up my scraps from Bo Bunny and pairing it with the Snow Day bunnies from Lawn Fawn.


Materials:
  • White card base: 4.25"W x 11"H, scored at 5.5" mark
  • Patterned Paper: Bo Bunny "Altitude" collection
  • Lawn Fawn: Snow Day stamp and die set
  • Mama Elephant: Sew Fancy Die Set
  • Copic Markers
  • Wink of Stella Pen
  • Adhesive Tape Runner and Foam Adhesive
  • Adhesive Pearls
Directions:
  • Die cut the stitched rectangle tag from white card stock.
  • Cut pieces of scrap paper to make a background template that fills the space
  • Cut a square (2.5"x2.5") from patterned paper
  • Cut a square (2.25"x2.25") from white card stock.  Stamp the bunnies and heart on this paper.
  • Color with Copic Markers
  • Add Wink of Stella for a subtle glitter affect
  • Add all the layers together.  Use foam adhesive to provide some dimension on the bunnies.
Here is a close-up of the card:


Happy Holidays!

Wednesday, December 23, 2015

2015 Countdown to Xmas: 25 Days, 25 Cards - Card #23

Card 23: The Christmas Fruit Tree.  I never liked Fruit Cake, but a Fruit Tree?  That sounds pretty fun!  This features stamps from Lawn Fawn and Mama Elephant.


Materials:
  • Kraft card base: 4.25"W x 11"H, scored at 5.5" mark
  • Patterned Paper: Pebbles "Harvest"
  • Lawn Fawn: Trim the Tree stamp set
  • Mama Elephant: Little Edibles stamp set
  • Simon Says Stamp: Stitched Rectangle dies
  • Copic Markers
  • Wink of Stella Pen
  • White Adhesive Pearls
  • White Gel Pen
  • Adhesive Tape Runner and Foam Adhesive
Directions:
  • Die cut the stitched rectangle from white card stock.
  • Stamp the tree and fruit with Memento Tuxedo Black ink; color carefully, it takes a while.  I didn't plan ahead, but if I were to do this again, I would have spread out the red and yellow fruits so they weren't too close together.  I probably would have added some other fruit colors too (oranges, grapes).
  • Stamp the tree base and trunk on patterned paper; paper piece onto the main tree. Accent the base with white gel pen.
  • Add Wink of Stella for a subtle glitter affect
  • Add pearls to the edge of each tree rim; accent with white gel pen
  • Add all the layers together.  
Here is a close-up of the card:


Happy Holidays!

Tuesday, December 22, 2015

2015 Countdown to Xmas: 25 Days, 25 Cards - Card #22

Who's in the mood for gingerbread?  Today's card features the Sweet Christmas gingerbread man from Lawn Fawn along with their scalloped rectangle dies.


Materials:
  • White card base: 4.25"W x 11"H, scored at 5.5" mark
  • Patterned Paper: Doodlebug Designs Sun-kissed; Taylored Expressions Rainbow.
  • Lawn Fawn: Sweet Christmas stamp set
  • Lawn Fawn: Scalloped Rectangle die set
  • Copic Markers
  • Versamark Ink
  • Ranger Embossing Powder in Liquid Platinum
  • Wink of Stella Pen
  • White Gel Pen
  • Adhesive Tape Runner and Foam Adhesive
Directions:
  • Die cut the scalloped rectangle tag from white card stock. Cut some rectangles slightly larger than the scalloped rectangles from patterned paper.
  • Stamp the gingerbread man with Memento Tuxedo Black ink; color with copic markers, accent with white gel pen.
  • Add Wink of Stella for a subtle glitter effect
  • Stamp the sentiment in Versamark ink and heat emboss.
  • Add all the layers together.
Here is a close-up of the card:


Happy Holidays!

Monday, December 21, 2015

2015 Countdown to Xmas: 25 Days, 25 Cards - Card #21

Playing around with the Brush Strokes stamp set from Mama Elephant.  Although it's hard to tell in the photo, the embossed sentiment looks awesome in the light.


Materials:
  • Kraft card base: 4.25"W x 11"H, scored at 5.5" mark
  • Patterned Paper: Bo Bunny "Altitude"
  • Mama Elephant: Brush Strokes and Jingle Greetings stamp sets
  • Mama Elephant: Sew Fancy die cuts
  • Simon Says Ink: Hollyhock (Pink), Wisteria (Purple)
  • Hero Arts Ink: Tide Pool
  • Versamark Ink
  • Ranger Embossing Powder in Liquid Platinum
Directions:
  • Die cut the center card from the smaller Mama Elephant rectangle die
  • Mask the right edge with some post-it tape.
  • Stamp the brush strokes on the card.  The embossing powder doesn't show up on the purple or pink that well, so make sure the aqua section is large enough.
  • Stamp the ornaments
  • Using Versamark Ink, stamp the sentiment, string. Heat emboss.
  • Add all the layers together.
Here is a close-up of the card:


Happy Holidays!

Sunday, December 20, 2015

2015 Countdown to Xmas: 25 Days, 25 Cards - Card #20

Using up more scraps for today's card.  I really like the way this turned out and may need to replicate this template until I run out of scraps!  I'm featuring the Reindeer Games and Jingle Greetings stamp sets from Mama Elephant.


Materials:
  • White card base: 4.25"W x 11"H, scored at 5.5" mark
  • Patterned Paper: Pebbles "Harvest" and My Mind's Eye "My Story"
  • Mama Elephant: Reindeer games stamp set
  • Mama Elephant: Jingle greetings stamp set
  • Washi Tape: Sugar Paper
  • Copic Markers
  • Versamark Ink
  • Ranger Embossing Powder in Liquid Platinum
  • Wink of Stella Pen
  • Adhesive Tape Runner and Foam Adhesive
Directions:
  • Die cut the stitched rectangle from white card stock.
  • Cut strips of patterned paper in varying widths and heights.  Arrange in pattern in center of the card.  Add washi tape for some shine.
  • Stamp the Reindeer and Gift with Memento Tuxedo Black ink; color with copic markers
  • Add Wink of Stella for a subtle glitter effect
  • Stamp the sentiment in Versamark ink and heat emboss.
  • Add all the layers together.  Use foam adhesive to provide some dimension on the reindeer.
Here is a close-up of the card:


Happy Holidays!

Saturday, December 19, 2015

2015 Countdown to Xmas: 25 Days, 25 Cards - Card #19

Using up my scraps for Card #19.  I cut three boxes out of different patterned paper and tied each with baker's twine.  Stamped a sentiment and voila!


Materials:
  • Kraft card base: 4.25"W x 11"H, scored at 5.5" mark
  • Patterned Paper: Taylored Expressions Rainbow
  • Mama Elephant: Jingle Greetings
  • Simon Says Stamp: Stitched Rectangle Dies
  • Versamark Ink
  • Ranger Embossing Powder in Liquid Platinum
  • Adhesive Tape Runner and Foam Adhesive
  • Pink Baker's Twine
Directions:
  • Die cut the stitched rectangle from white card stock.
  • Stamp the sentiment in Versamark ink and heat emboss.
  • Cut three boxes from three different pieces of patterned paper.  Wrap each box with twine.  Use foam adhesive to adhere to card base.
  • Adhere all the remaining layers.
Here is a close-up of the card:


Happy Holidays!

Friday, December 18, 2015

2015 Countdown to Xmas: 25 Days, 25 Cards - Card #18

Card #18: These Polar Pals from Mama Elephant are paired with the Joy to the Woods stamp set from Lawn Fawn to make this fun wintery card.


Materials:
  • White card base: 4.25"W x 11"H, scored at 5.5" mark
  • Patterned Paper: Bo Bunny "Altitude"
  • Mama Elephant: Polar Pals stamp set
  • Lawn Fawn: Joy to the Woods stamp set
  • Mama Elephant: Sew Fancy die cuts
  • Copic Markers
  • Versamark Ink
  • Ranger Embossing Powder in Liquid Platinum
  • Wink of Stella Pen
  • Adhesive Tape Runner and Foam Adhesive
  • White Gel Pen
Directions:
  • Die cut the card front from the largest sew fancy rectangle. 
  • Cut patterned paper to be slightly smaller.
  • Stamp the penguins with Memento Tuxedo Black ink; color with Copic markers.
  • Add Wink of Stella for a subtle glitter affect
  • Stamp the tree and sentiment in Versamark ink and heat emboss.
  • Color in the tree using a white gel pen.
  • Adhere all the layers together.  Use foam adhesive to provide some dimension on the penguins.
Here is a close-up of the card:


Happy Holidays!

Thursday, December 17, 2015

2015 Countdown to Xmas: 25 Days, 25 Cards - Card #17

Card #17 features more stamps from The Stamps of Life Christmas2build set -- the stocking and sentiment.  I paired that with the brush strokes from Mama Elephant.


Materials:
  • Kraft card base: 4.25"W x 11"H, scored at 5.5" mark
  • Patterned Paper: Pebbles "Harvest" and My Mind's Eye "My Story" collections
  • The Stamps of Life: Christmas2build
  • Mama Elephant: Brush Strokes
  • Washi Tape: Sugar Paper
  • Copic Markers
  • Hero Arts Pale Tomato Stamp
  • Versamark Ink
  • Ranger Embossing Powder in Liquid Platinum
  • Wink of Stella Pen
  • Adhesive Tape Runner and Foam Adhesive
Directions:
  • Stamp the paint splats on some white card stock.  I used a hybrid ink that doesn't dry fast, so the embossing powder sticks to part of it (on purpose).
  • Stamp the sentiment. Sprinkle embossing powder, heat emboss.
  • Stamp the stocking on some patterned paper.  Cut out the piece and paper piece it back together.
  • Adhere to center of paint splats with foam adhesive.
  • Cut some patterned paper so it's slightly wider than the white paper.
  • Adhere all the layers.
Here is a close-up of the card:


Happy Holidays!

Wednesday, December 16, 2015

2015 Countdown to Xmas: 25 Days, 25 Cards - Card #16

Card #16 features mittens from The Stamps of Life Christmas2build set.  I am traveling right now and don't have access to all my supplies.  What I love about the stamps on these sets is that they're super easy to fussy cut!


Materials:
  • Kraft card base: 4.25"W x 11"H, scored at 5.5" mark
  • Patterned Paper: Doodlebug Designs Kraft in Color and Sugar Shoppe Collections
  • The Stamps of Life Christmas2build stamp set
  • Simon Says Stamp: Winter Wishes stamp (for the sentiment)
  • Lawn Fawn: Scalloped rectangle dies
  • Versamark Ink
  • Ranger Embossing Powder in Liquid Platinum
  • Adhesive Tape Runner and Foam Adhesive
  • Pink Baker's Twine
  • Glue dots
Directions:
  • Die cut the scalloped rectangle tag and stitched rectangle dies from a mix of patterned paper and white card stock. Cut the pink card stock slightly larger than the green.
  • Stamp the mittens on pink and green card stock twice for each color.
  • Cut the mittens.  Paper piece the green cuff onto the pink mitten.
  • Using Versamark ink, stamp the sentiment in the top center of the scalloped rectangle.  Heat emboss with liquid platinum embossing powder.
  • Using glue dots, make a twist/loop with the baker's twine. Adhere in place.
  • Use foam adhesive to attach the mittens.
  • Adhere the remaining layers together.
Here is a close-up of the card:


Happy Holidays!
Tuesday, December 15, 2015

2015 Countdown to Xmas: 25 Days, 25 Cards - Card #15

Today's card features a stamp set called "Snow Day" from Lawn Fawn.  I purchased this stamp set earlier in the year (March, I think).  I've used the bunny rabbits in other cards, but today I am using several stamps from the set: both trees, the bows, bunnies, hearts and sentiment.  It's an awesome set.


Materials:
  • Kraft card base: 4.25"W x 11"H, scored at 5.5" mark
  • Patterned Paper: Pebbles Harvest Collection
  • Lawn Fawn: Snow Day stamp and die set
  • Simon Says Stamp: Stitched Rectangle dies
  • Copic Markers
  • Hero Arts Shadow Ink: Pale Tomato, Tide Pool
  • Simon Say Stamp Hybrid Ink: Jelly, Lucky
  • Versamark Ink
  • Ranger Embossing Powder in Liquid Platinum
  • Wink of Stella Pen
  • Adhesive Tape Runner and Foam Adhesive
Directions:
  • Die cut the stitched rectangle die from white card stock.
  • Trim a piece of patterned paper just slightly larger than the die cut piece.
  • Stamp the two darker green trees (using the Lucky color) in the center of the card.  Also stamp the same image twice on masking paper or post-it paper.  Cover the stamped images with the masks.  
  • Now stamp the lime green (Jellybean color) behind those trees.  Mask those trees as well. 
  • Finally, stamp the teal (Tide pool color) trees.  Remove the masks.
  • Stamp the bows on the three Jellybean colored trees.
  • Stamp the bunnies with Memento Tuxedo Black ink; color with copic markers
  • Add Wink of Stella for a subtle glitter effect
  • Fussy cut (or die cut) the bunnies and heart.
  • Stamp the sentiment in Versamark ink and heat emboss.
  • Adhere all the layers together.  Use foam adhesive to provide some dimension on the heart and bunny rabbits.
Here is a close-up of the card:


Happy Holidays!

Monday, December 14, 2015

2015 Countdown to Xmas: 25 Days, 25 Cards - Card #14

An old favorite is returning for Card #14.  This features the Sparkle & Shine stamp set from Simon Says Stamp and the fun heart snowflake from their Winter Wishes set.


Materials:
  • White card base: 4.25"W x 11"H, scored at 5.5" mark
  • Patterned Paper: Bo Bunny Altitude
  • Simon Says Stamp: Stitched Rectangle dies
  • Simon Says Stamp: Stitched Circle dies
  • Simon Says Stamps: Sparkle and Shine & Winter Wishes Stamp Sets
  • Mama Elephant: Jingle Greetings (for the bow)
  • Versamark Ink
  • Ranger Embossing Powder in Liquid Platinum
  • Adhesive Tape Runner and Foam Adhesive
Directions:
  • Die cut the largest stitched rectangle tag from some white card stock
  • Die cut a stitched circle from some patterned paper.
  • Using Versamark ink, carefully stamp the sentiment in the center of the circle and stamp snowflakes around it.
  • Sprinkle with embossing powder and heat emboss.
  • Stamp the string and bow the same way; heat emboss that.
  • Cut strips of patterned paper to line the left and right edges. 
  • Glue everything together according to the image.
Here is a close-up of the card:


Happy Holidays!

Sunday, December 13, 2015

2015 Countdown to Xmas: 25 Days, 25 Cards - Card #13

Card #13: Mini Messages on Gift Tags.  I am loving the new Mama Elephant Mini Messages stamp set.  At first I wanted to make a bunch of gift cards, but after making three, I decided to turn them into a card.


Materials:
  • Kraft card base: 5.5"W x 8.5"H, scored at 4.25" mark
  • Patterned Paper: Lawn Fawn Let's Bokeh
  • Mama Elephant: Mini Messages Stamps
  • The Stamps of Life: Tag die cuts
  • Simon Says Stamp: Stitched Rectangle dies
  • Versamark Ink
  • Ranger Embossing Powder in Liquid Platinum
  • Adhesive Tape Runner and Foam Adhesive
  • Green, Yellow and Red Baker's Twine
Directions:
  • Die cut the white card insert using the largest stitched rectangle die.
  • Die cut three tags from the patterned paper
  • Die cut the three rectangles for the messages
  • Stamp the messages in Versamark ink and heat emboss.
  • Punch a hole through the top of each tag
  • Adhere all the layers of the tags together, add some twine to the tags.
  • Using foam adhesive, attach to the card insert and card base.
Here is a close-up of the card:


Happy Holidays!

Saturday, December 12, 2015

2015 Countdown to Xmas: 25 Days, 25 Cards - Card #12

Card #12: We Wish you a Washi Christmas... this is one of the easiest cards to make and replicate if you're making tons of cards at once.


Materials:
  • White card base: 4.25"W x 11"H, scored at 5.5" mark
  • White card insert
  • Washi tape
  • Simon Says Stamp: Stitched Rectangle dies
  • Mama Elephant: Sew Fancy dies
  • The Stamps of Life: Christmas tree die
  • Adhesive Tape Runner and Foam Adhesive
  • Pink Baker's Twine
Directions:
  • Die cut the tree from a piece of white card stock. Use the sew fancy dies to cut the smaller rectangle.
  • Using washi tape, line the card insert and place strips of tape across the card in alternating order.  
  • Glue the layers together.  Use foam adhesive to create some dimension on the tree.
  • Adhere the twine to the top of the tree using a glue dot.
Here is a close-up of the card:


Happy Holidays!

Friday, December 11, 2015

2015 Countdown to Xmas: 25 Days, 25 Cards - Card #11

Card 11: Those nerdy birdies from Lawn Fawn's Science of Love stamp set are back.  This time in a holiday setting!  


Materials:
  • White card base: 4.25"W x 11"H, scored at 5.5" mark
  • Patterned Paper: Lawn Fawn Let's Bokeh
  • Lawn Fawn: Science of Love stamps and dies; stitched hillside borders dies
  • Lawn Fawn: Winter Sparrows stamps
  • Mama Elephant: Sew Fancy dies
  • Simon Says Stamp: Stitched Rectangle dies
  • Copic Markers
  • Versamark Ink
  • Ranger Embossing Powder in Liquid Platinum
  • Wink of Stella Pen
  • White Gelly Roll Pen
  • Adhesive Tape Runner and Foam Adhesive
Directions:
  • Die cut the main card front out of the sew fancy die
  • Die cut a window using the stitched squares from the card front and blue patterned paper.
  • Die cut a border from the red paper using the stitched squares
  • Die cut a snowy slope from white card stock
  • Stamp the birdies and flask with Memento Tuxedo Black ink; color with copic markers 
  • Add Wink of Stella for a subtle glitter affect; add white accents to the beakers.
  • Stamp the sentiment in Versamark ink and heat emboss.
  • Add all the layers together.  Use foam adhesive to provide some dimension to the birds.
Here is a close-up of the card:


Happy Holidays!

Thursday, December 10, 2015

2015 Countdown to Xmas: 25 Days, 25 Cards - Card #10

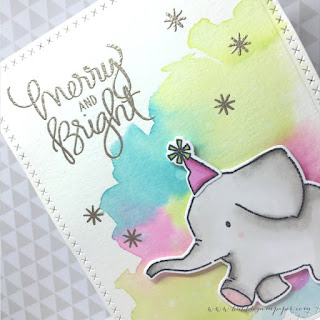
Card #10: Merry and Bright Elephant Greetings featuring Mama Elephant products.


Materials:
  • White card base: 4.25"W x 11"H, scored at 5.5" mark
  • Watercolor Paper: 4.25"W x 5.5"H
  • Distress Inks: Peacock Feathers, Squeezed Lemonade, Seedless Preserves
  • Mama Elephant: Ella and Friends stamp and die set
  • Mama Elephant: Sew Fancy die set
  • Mama Elephant: Jingle Greetings stamp set
  • Versamark Ink
  • Ranger Embossing Powder in Liquid Platinum
  • Wink of Stella Pen
  • Adhesive Tape Runner and Foam Adhesive
Directions:
  • Die cut water color paper using the largest die from the Sew Fancy dies set.
  • Apply water to distress inks and paint a splotchy watercolor pattern in the lower right corner of the watercolor paper; allow time to dry completely.  You can use a heat tool too.
  • Stamp the elephant and hat with Memento Tuxedo Black ink on copic-friendly card stock.  Color with copic markers.  I used W00, W2, W5 and some R21 on the feet.  For the hat, I used V91, V93, V95 and YG13
  • Stamp the sentiment and stars in Versamark ink and heat emboss.
  • Add all the layers together.
Here is a close-up of the card:


Happy Holidays!

Wednesday, December 9, 2015

2015 Countdown to Xmas: 25 Days, 25 Cards - Card #9

I am playing major catch-up on all my cards.  Here is Card #9: You Warm My Heart featuring products from Lawn Fawn.


Materials:
  • Kraft card base: 4.25"W x 11"H, scored at 5.5" mark
  • Patterned Paper: Lawn Fawn Let's Bokeh
  • Lawn Fawn: Snow Day stamp and die set
  • Lawn Fawn: Scalloped Rectangle die set
  • Simon Says Stamp: Stitched Rectangle dies
  • My Favorite Things: Pierced Tags die set
  • Copic Markers
  • Hero Arts Pale Tomato Stamp
  • Versamark Ink
  • Ranger Embossing Powder in Liquid Platinum
  • Wink of Stella Pen
  • Adhesive Tape Runner and Foam Adhesive
  • Green Baker's Twine
Directions:
  • Die cut the scalloped rectangle tag and stitched rectangle dies from a mix of patterned paper and white card stock.
  • Stamp the heart on some white card stock with Hero Arts Pale Tomato ink
  • Stamp the scarf with Memento Tuxedo Black ink; color with copic marker (YG03, YG17, YG25)
  • Add Wink of Stella for a subtle glitter affect
  • Stamp the sentiment in Versamark ink and heat emboss.
  • Add all the layers together.  Use foam adhesive to provide some dimension on the heart.
Here is a close-up of the card:


Happy Holidays!

Tuesday, December 8, 2015

2015 Countdown to Xmas: 25 Cards, 25 Days - Card #8

It's beginning to look a lot like Christmas... okay maybe not in the 80 degree heat of Los Angeles.  However, I love this fun snowman stamp from Paper Smooches, so I made a snowy card.


Materials:
  • White card base: 4.25"W x 11"H, scored at 5.5" mark
  • Patterned Paper: Echo Park creative agenda collection
  • Paper Smooches: Cool Dudes Stamp set
  • Lawn Fawn: Scalloped Rectangle dies
  • Simon Says Stamp: Stitched Rectangle dies
  • Copic Markers
  • Memento Tuxedo Black Ink
  • Versamark Ink
  • Ranger Embossing Powder in Liquid Platinum
  • Wink of Stella Pen
  • Adhesive Tape Runner and Foam Adhesive
Directions:
  • Stamp the snowman on some white card stock with Memento Tuxedo Black Ink
  • Color with copic markers, add Wink of Stella for a subtle glitter affect, add to the "snow" too
  • Stamp the sentiment in Versamark ink and heat emboss.
  • Die cut the stitched and scalloped rectangles from patterned paper
  • Add all the layers together
Here is a close-up of the card:


Happy Holidays!

2015 Countdown to Xmas: 25 Days, 25 Cards - Card #7

Day 7 already!  Today's card is a little on the late side.  It is a fun festive card featuring the same Bo Bunny patterned paper collection I used in yesterday's card along with the Winter Penguin stamp set from Lawn Fawn.


Materials:
  • White card base: 4.25"W x 11"H, scored at 5.5" mark
  • Patterned Paper: Bo Bunny Altitude Collection
  • Lawn Fawn: Winter Penguin stamp and die set
  • Sizzix: Circle dies
  • Lawn Fawn: Stitched Hillside border dies
  • Copic Markers
  • Memento Tuxedo Black Ink
  • Wink of Stella Pen
  • Adhesive Tape Runner and Foam Adhesive
Directions:
  • Stamp the penguin on some white card stock with Memento Tuxedo Black Ink
  • Color with copic markers, add Wink of Stella for a subtle glitter affect, add to the "ice" too
  • Stamp "happy holidays" in Versamark ink and heat emboss.
  • Die cut the circles from the main card insert and patterned paper; offset the circle on the edge of the card
  • Cut a strip of striped patterned paper 1" wide, cut a thin strip of purple snowflake paper 0.125" wide; glue to the edge of the card
  • Add all the layers togetehr
Here is a close-up of the card:


Happy Holidays!

Sunday, December 6, 2015

2015 Countdown to Xmas: 25 Days, 25 Cards - Card #6

It's Day 6 and those Playful Pups from Mama Elephant are back!  I really love the die-cut inlay technique and decided to stick with that for today's card.


Materials:
  • White card base: 4.25"W x 11"H, scored at 5.5" mark
  • Patterned Paper: Bo Bunny Altitude Collection
  • Mama Elephant: Playful Pups stamp set
  • Mama Elephant: Merry Script die
  • Mama Elephant: Sew Fancy die
  • Sizzix: Scalloped Circles and Circle dies
  • Lawn Fawn: Stitched Hillside border dies
  • Copic Markers
  • Memento Tuxedo Black Ink
  • Wink of Stella Pen
  • Adhesive Tape Runner Foam Adhesive
Directions:
  • Stamp the puppy on some white card stock with Memento Tuxedo Black Ink
  • Color with copic markers, add Wink of Stella for a subtle glitter affect
  • Die cut the main card front from the Sew Fancy rectangular die and "merry" die
  • Die cut a scalloped circle from the blue/green paper
  • Die cut two circles from the snowflake and white paper
  • Die cut a snowy hill from the two circles
  • Die cut "merry" from some more patterned paper
  • Glue everything in place
  • Add the puppy to the front with foam adhesive
Here is a close-up of the card:


Happy Holidays!

Saturday, December 5, 2015

2015 Countdown to Xmas: 25 Days, 25 Cards - Card #5

Seasons Greetings, everyone!

Today's card features some fun die cuts from Simon Says Stamp and a fun Christmas Tree stamp from Lawn Fawn.


Materials:
  • White card base: 4.25"W  11"H, scored at 5.5" mark
  • Glitter Paper
  • Simon Says Stamp Circle Loops, Seasons Greetings and Stitched Rectangle die cuts
  • Lawn Fawn Sweet Christmas stamp and die sets
  • Adhesive
  • Copic Markers
Directions:
  • Stamp the tree in Memento Tuxedo Black Ink, color with copic markers and die cut
  • Cut all the shapes out of the white card stock and glitter paper
  • Glue everything in place swapping the outline of the circles and greeting in the white card stock with the glitter paper versions.
  • Adhere the tree with foam adhesive
That's all!  Enjoy!

Friday, December 4, 2015

2015 Countdown to Xmas: 25 Days, 25 Cards - Card #4

Happy Friday!

Today's card  (Day 4) is the perfect card for those with very little time.  It's a single-layer correspondence card and requires absolutely no die-cutting or fancy layers.  Instead, it uses one stamp set, Mama Elephant's Polar Pals stamp set, and washi tape.  I love washi tape!  This pretty roll is from Pinkfresh Studios.


Materials:
  • 2 pieces of white cardstock: 5.5"W x 4.25"H
  • Mama Elephant: Polar Pals stamp set
  • Pinkfresh Studio Ombre Airmail Peach and Mint Washi Tape
  • Copic Markers
    • Hat: G000, BBG23
    • Scarf: R01, R20, R22
    • Penguin: C1, C3, C5, C7
    • Beak and Feet: YR15, YR21
  • Memento Tuxedo Black Ink
  • Versamark Ink
  • Ranger Embossing Powder in Liquid Platinum
  • Wink of Stella Pen
  • Adhesive Tape Runner
Directions:
  • Stamp the penguin in the lower right corner of the card stock with Memento Tuxedo Black Ink
  • Color with copic markers, add Wink of Stella for a subtle glitter affect
  • Line the top of the card with a single piece of washi tape and wrap around the edges; the tape should be placed approximately 0.25" from the top of the card
  • Stamp the sentiment in versa mark ink and heat emboss with embossing powder
  • Adhere the second piece of card stock to the back of this card (to cover the loose ends of washi tape and the copic marker that bleeds through the other side).
  • Line the flap of the envelop with more washi tape.
Here is a close-up of the card:


Happy Holidays!

Thursday, December 3, 2015

2015 Countdown to Xmas: 25 Days, 25 Cards - Card #3

Hi everyone!

Have you ordered (or made) your holiday cards for the season?  Ironically, I love making Christmas cards, but I never get around to sending them!  Today's card celebrates the greetings of the season.

I love this mini stitched envelope die cut from Simon Says Stamp.  I've paired that with paper from Authentique and the sentiment is Lawn Fawn's signature script sayings.  This is another card that can be replicated pretty easily.


Materials:
  • Kraft Cardstock: 4.25"W x 11"H, scored at 5.5" mark
  • Patterned paper from Authentique "Cozy" Collection
  • Simon Says Stamp Mini Stitched Envelope and Stitched Rectangle Dies
  • Simon Says Stamp Gifts of Love Stamps Set (for Candy Cane)
  • Lawn Fawn Winter Scripty Sayings
  • Hero Arts Red Royal Ink
  • Copic Marker R24
  • Versamark Ink
  • Ranger Embossing Powder in Liquid Platinum
  • Wink of Stella
  • Adhesive Tape Runner and Foam Adhesive
Directions:
  • Die cut three envelopes from the stitched envelope die, glue down the edges and top of two envelopes.  Keep one envelope open
  • Stamp the candy cane on some spare white card stock and color with copic markers. Trim this piece down to 1"W x 1.25"H; trim some extra patterned paper slightly larger to make a border.
  • Die cut that largest stitched rectangle from white card stock to serve as the front base.
  • Stamp the greeting at the bottom with Versamark ink.  Heat emboss with embossing powder
  • Assemble all the pieces to match the picture.
Here is a close-up of the card:


Happy Holidays!

Wednesday, December 2, 2015

2015 Countdown to Xmas: 25 Days, 25 Cards - Card #2

Hi everyone!

I'm here with Day 2 of my 2nd Annual Countdown to Xmas: 25 Days, 25 Cards!

Today's card uses stamps from this month's Simon Says Stamp card kit.  Along with another awesome Jingle Greetings stamp from Mama Elephant.  I also used a bunch of Hero Arts inks to create the background and stamped images.  This card was super easy to make and would be easy to replicate in different colors to make a nice gift set.


Materials:
  • White Cardstock: 5.5"W x 8.5"H, scored at 4.25" mark
  • Avery Elle Finished Frames Die Cut
  • Simon Says Stamp Gifts of Love Stamp Set
  • Mama Elephant Jingle Greetings Stamps
  • Hero Arts Ombre Ink (Pink)
  • Hero Arts Shadow Ink (Tide Pool, Mint Julep)
  • Hero Arts Pigment Ink (Unicorn White)
  • Versamark Ink
  • Ranger Embossing Powder in Liquid Platinum
  • Wink of Stella
  • White Gel Pen
  • Adhesive Tape Runner
Directions:
  • Stamp the stockings in the center of a piece of white card stock
  • Stamp the stocking on post-it paper three time.  Cut out the stockings from the post-it paper to create a mask.  Overlay this mask on top of the stockings
  • Using a foam blender tool, gently apply the Tide Pool and Mint Julep ink in a swirly motion over the body of the stockings.  
  • Gently remove the post-it paper.
  • Draw a line across each of the stockings about 0.25" down from the top
  • Using the white pigment ink, stamp snowflakes all over the stockings and the green/blue background
  • Stamp the greeting at the bottom with Versamark ink.  Heat emboss with embossing powder
  • Die cut this piece using the largest Finished Frames die
  • Adhere all layers together.
Here is a close-up of the card:


Happy Holidays!

Tuesday, December 1, 2015

The 12 Months of Christmas Link Up: New Challenge #12 - Santa Claus is Coming to Town


Note: If you are looking for the 2015 Countdown to Xmas: 25 Days, 25 Cards - Day 1 post, click here.


Happy December, everyone!

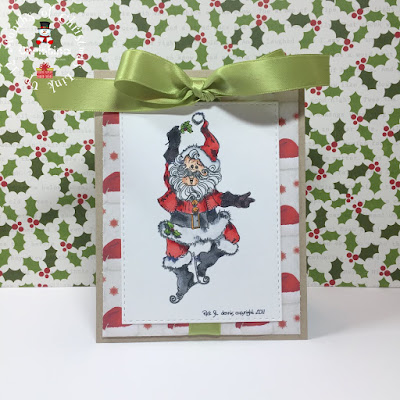
Today I'm here with another 12 Months of Christmas Link Up Design Challenge.  This month we're featuring some really fun digi stamps by Rick St. dennis.

Here are the challenge details:
  • Blog link: The 12 Months of Christmas Link Up 
  • Challenge dates: December 1-31, 2015
  • Optional theme: "Santa Claus is Coming to Town" - if you would like to participate in the optional theme for the month, create a holiday card that showcases everyone's favorite Jolly Old St. Nicholas / Santa Claus himself!  Also add "FT" after your name, so we can include it in the prize drawing.  This theme is optional.  You only need to follow the theme if you are interested in winning 3 digital images from Rick st. Dennis.
  • As always: All card submissions (with or without optional theme) will be eligible to earn a free paper each month and some extra digital goodies.
  • Guest Sponsor: Rick St. dennis (see info below).
  • Additional Sponsor: Décosse's Dynamite Doodles
  • Prize Info: 
    • From Rick St. dennis: Three (3) Digi Stamps by Rick St. dennis to one random winner chosen from those who participate in the optional theme.
    • From Décosse's Dynamite Doodles: 
      • Prize 1: one free digital paper to EVERYONE who links up a minimum of two cards. The theme for these cards is optional
      • Prize 2: a mini-set of six digital papers called Santa Claus is Coming to Town to a winner picked at random.
For some inspiration, here is the card I designed and details on how I made the card.


Materials:
  • Kraft card stock for card base: 4.25"W x 11"H, scored at 5.5" mark
  • Mistletoe Santa digital stamp from Rick St. dennis
  • Santa Hat / Santa Claus is Coming to Town patterned paper from Décosse's Dynamite Doodles
  • Simon Says Stamp Stitched Rectangles Dies
  • White card stock for coloring
  • Copic Markers
  • Adhesive Tape Runner and Glue Dots
  • Green Satin Ribbon
Directions:
  • Size the image of Santa and print on copic-friendly paper
  • Color the image using copic markers
    • Santa Hat/Suit: R22, R24, R29
    • Gloves/Belt/Boots: N2, N4, N6
    • Beard: C00, C1
    • Fur: C1, C3
    • Face: E00, E11, E13
    • Mistletoe: YG13, YG17
    • Berries: R29
  • Cut out the image using the Simon Says Stamp die
  • Print the Santa Hat Paper and trim just slightly smaller than the card base.
  • Adhere the layers together.

SPONSOR INFO:


As I mentioned above, this month's challenge is brought to you by our Guest Sponsor, Rick St. dennis. Here's some info about Rick:
  • Rick St. dennis MFA has been an artist, designer, stage designer and instructor for over 45 years, you can find his full Bio here. His digital stamp images can be found on Zibbet or Etsy. Inspiration projects from the Rick St. dennis Elite Design Team can be found on the Sparkle and Glitter blog, or for the darker images on the Airless Chambers blog
Our additional sponsor is Décosse's Dynamite Doodles.

http://decossesdynamitedoodles.blogspot.ca/
Now it's your turn!  Create a holiday card and be sure to add it to the 12 Months of Christmas Link Up Challenge blog!  Look forward to seeing your amazing designs!

Happy Card Making!