Wednesday, May 27, 2015

"New" Product Tuesday (on Wednesday): Baby Cards, Mirror Stamping and a VIDEO!

Hello everyone,

One of these days, I'll get back to my normal schedule of posting on Tuesday.  I had my card done and ready to go, but decided in the eleventh hour to make a video.  Since I'm still new at this video thing, it took me an extra day.  However, I made TWO more cards... so that's kind of a bonus, right?


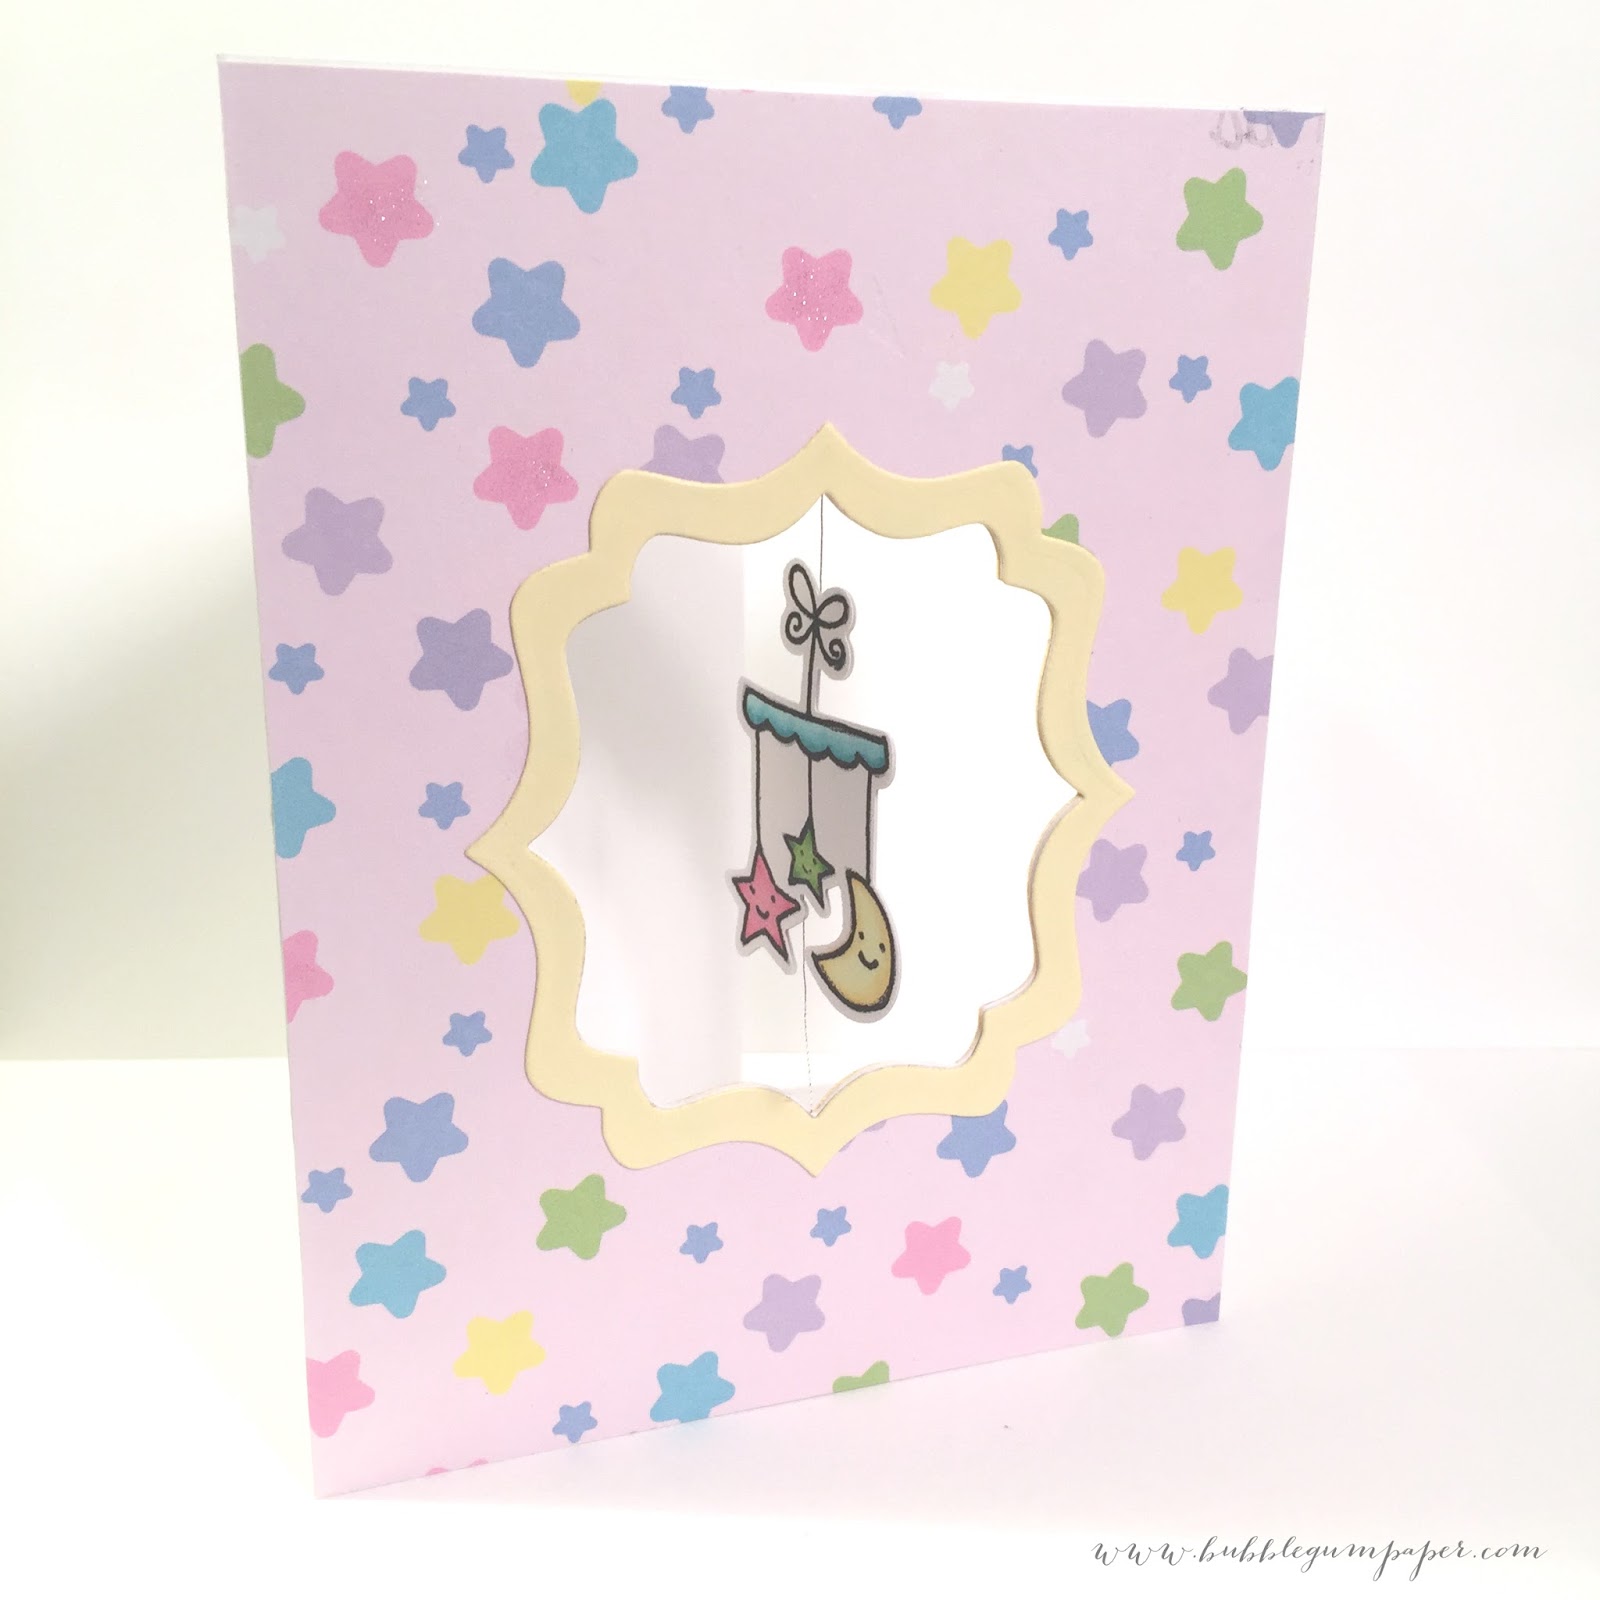
This week, I am featuring the Lawn Fawn Plus One stamp and die set.  This set is perfect for baby shower cards and baby cards. I wanted to make a card with a mobile that dangles in the front window, but I needed to make a mirror image of the stamp... so this was a super fun technique to try.
I also incorporated a new technique called "mirror stamping."  That is, it's new to me.

I'm also submitting these cards to the Lawnscaping Challenge #106 which is all about incorporating new techniques.

Video:

I made a video for this card too.  Yes, very rare for me to make videos, but I'm getting there.  My BFF gave me a tripod so that helped a ton. I no longer had to tape the camera to my step stool to get an overhead shot!  If you have trouble viewing this video, you can watch it on YouTube here.


Materials:

Directions:
  • Watch my YouTube video for details on how to make this card... trust me, it's easier to follow than trying to understand the steps below!  But if you want, you can keep reading below.
  • Stamp the baby mobile stamp using Memento Tuxedo Black Ink
  • Create a "mirror" image of the stamp by stamping the image on the back of the smooth side of a larger stamp.  You can use any stamp.  I happened to have this Simon Says Stamp birthday stamp set out on my desk.  Once you stamp the image on the larger stamp, carefully turn it around and stamp it on the paper.
  • Outline the mirror image with the Copic Multiliner pen to darken the outline.
  • Color in with Copic Markers
    • BG000, BG53, BG57
    • YG03, YG17, YG67
    • R81, R83, R85
    • Y0000, Y000, Y21
    • Copic Multiliner
  • Die cut the images using the coordinating die. For the mirror image, you will need to die cut from the back.
  • Die cut the fancy frame label from the front of the patterned paper and the front of the card base.  Also die cut four yellow frames using the same size window die and the one just slightly larger.
  • Glue the mobile images to some thread and adhere to the front card base.
  • Adhere the patterned paper to the front
  • Add the yellow frames to the inside and outside of the card.
  • Add some glitter to the pink and blue stars using the Wink of Stella clear glitter pen.
Here are image of both cards.  You can see the mirror stamping effect on the pink card.


Please leave a comment below and let me know what you think of this mirror stamping technique!

Have a wonderful week!


Saturday, May 23, 2015

Blog Hop: JessicaLynnOriginal.com Brentwood Owl's Summertime Fun!

Hello friends,

I am very excited to announce that I'm a new member of the creative JessicaLynnOriginal.com Design Team from June 2015-January 2016.  We're kicking off the festivities with the "Start of the Summer" Design Team Showcase Blog Hop. Are you ready for summer?  I know I am!  Today we are featuring projects using the Brentwood Owl's Summertime Fun digital stamp to showcase and introduce all the DT members. BONUS: for today only, this digital stamp is available for FREE!

This fun stamp captures the essence of summer vacation and beach side adventures.  You can use this digital stamp in all sorts of ways.  Relax, soak up the sun and hop along with us.  If you're coming from JENNIFER'S blog then you're in the right place!

I was inspired by my favorite beach vacation destination: Hawaii! Granted, I live in Southern California and our beaches here are quite nice, but there's something special about Hawaii.  Life is more relaxed, peaceful and the water is gorgeous.  Oh, and don't get me started on the food... yum!  But I digress... back to the hop!  Here's my card:


Materials:
  • Card base: 4.25"W x 11"H, scored at 5.5" mark
  • Patterned paper cut to 4.25"W x 5.5"H (Carta Bella Summer Lovin' collection)
  • JessicaLynnOriginal.com Brentwood Owl's Summertime Fun digital stamp
  • Aqua ribbon
  • Simon Says Stamp stitched circle dies
  • Acetate for the shaker window
  • Assorted Sequins
  • Copic Markers (colors listed below)
  • Foam sheets and adhesive
Directions:
  • Print out the digital stamp on Copic-friendly paper
  • Using Copic markers, color in the Brentwood Owl and fussy cut him out.  I used a variety of colors for my image:
    • Body: E13, E15, E17, E18, E30, E42
    • Beak and Feet: YR21, YR15
    • Coconut: E13, E15, E18
    • Starfish: R20, R22
    • Glasses: YG13, YG25
    • Sand: E30
  • I chose pink for the starfish because I kept thinking about SpongeBob's buddy, Patrick.  

  • Die cut the largest circle from the printed Summer Words patterned paper and tie the aqua ribbon across the front.
  • Die cut the second largest circle from the green paper.  Attach the owl image through the opening and then glue the acetate sheet behind him.
  • For the blue bubble paper, add foam adhesive or cut a circle out of craft foam to add dimension to the shaker card.  Add an assortment of sequins in beach friendly colors
  • Here are the three layers of the card before I glued them together:
  • Here's another look at the finished card:


Now for the fun part... PRIZES!

Did I say Prizes?  Yes, indeed!  You could win a prize! Let us know what you think in the comments below.  Comment on each of the blogs in the hop and you'll be eligible to win a $25 gift certificate towards anything at JessicaLynnOriginal.com!  After the hop, Jessica will randomly select a winner and announce the lucky person on her blog on Sunday, May 24, 2015.

Next on the hop is the talented SHARON where she has a not one, but two amazing projects showcasing all the summer fun! Thanks for stopping by and keep hopping!

Note: if you get lost along the way, or a link doesn't work, click here to see a list of the blogs!

Happy Summer!

Christina

Thursday, May 21, 2015

"New" Product Tuesday (on Thursday)... Birthday Greetings featuring Mama Elephant

Hi everyone,

I've been in NYC all week and just returned... so apologies for this delayed NPT post. This Tuesday was my Uncle John's birthday and I was excited to spend it with him and many family members in person.  I don't head back to the east coast as often as I would like and when I do, I usually head to MA vs. NY/NJ.  I was grateful to spend some quality time with family on this special occasion. We had a great reunion filled with laughter, good food and fun!

In honor of my Jersey-based extended family, I made a card using Mama Elephant (also based in New Jersey) stamps and dies.  I used the Mama Elephant Up and Away stamps I featured last week and their fun Birthday script die, which is my "new" product for today.  I love Mama Elephant's script word dies.  I think I have all of them at this point!  These work perfectly for inlays.


I had a lot of fun using my Copic markers to color in the balloons and monkey.  I'm including the colors used in the list below.

Materials:

  • Kraft card base: 4.25"W x 11"H, scored at 5.5" mark
  • White card front: 4"W x 5.25"H
  • Purple card stock for the birthday die cut
  • Mama Elephant Up and Away stamps and dies
  • Mama Elephant Birthday script creative cuts dies
  • "Happy" sentiment stamp from the Simon Says Stamp Paper Hugs stamp set
  • Various colors of sequins
  • Memento Tuxedo Black Ink
  • Copic Markers
    • Monkey Body: E13, E15, E17, E18
    • Monkey Face/Tummy: E30, E42, R20
    • Pink Balloons: RV21, RV23, RV25
    • Purple Balloons: RV55, RV66, RV69
    • Yellow Balloons: Y21, YR21, Y18
    • Green Balloons: YG61, YG13, YG25
  • Adhesive tape runner and foam adhesive

Directions:

  • Stamp the Monkey and Balloons on some scrap white card stock and color with copic markers.  I listed the colors above.  Use the coordinating dies to cut them out.
  • Use the "birthday" die to cut out birthday at the bottom of the card and some purple card stock.
  • Stamp "happy" above the birthday die cut.
  • Stamp the balloons on some post-it paper to create a mask and die cut them out.  This will help position the strings which are stamped directly on the white card front.
  • Adhere the monkey and balloons using foam adhesive
  • Adhere the purple birthday inlay into the die cut shape. Add the white cut outs for the loops in all the letters.
  • Here's a close-up of the birthday inlay:
  • Add the sequins.  I used green, purple, gold and white sequins.
  • Enjoy!
Happy Birthday, Uncle John!


Friday, May 15, 2015

Random Post: 1980s Bargain Hunter Game & Scrapbook Shopping Sprees

Hi all,

Today's post is totally random, but it just popped into my head so I thought I'd post it here.  I know many of you can relate... especially fellow scrapbook and paper hoarders (err... I mean enthusiasts). Do any of you remember the game from the 1980s by Milton Bradley called "Bargain Hunter"?  Here's what it looked like:

Image source: Amazon.com

I had this game... and I played it quite often.  I really wanted the game because of the credit card machine.  Keep in mind, this was back in the day when people had to run your credit card through a "machine" using carbon copy paper... it's very similar to the Sizzix Big Shot, actually.  Anyhow, as a kid, I thought it would be SO COOL to have my own credit card and credit card machine.  In the game, you have a shopping list and your goal is to go around to different department stores to pick up the items on your list.  You have a set budget and the goal is to purchase everything at the lowest prices.  The stores changed the prices every now and then, so you had to keep track whether an item was a "bargain" or "full-priced..."

Now, why am I posting this now?

Well, there are some stamps and dies I have on my wish list that I haven't purchased yet.  I'm waiting for that "bargain" to pop-up.  Case in point... I love Lawn Fawn stamps.  You've seen me use them quite often.  Usually these are NEVER on sale on the Lawn Fawn site... so I wait until Scrapbook Expos to purchase them.  There's a booth that usually has a Buy 3, Get 1 Free deal... so essentially the max discount is 25% off.  There are other sites out there that have 10% or 15% off deals now and then, usually around Black Friday.  Recently, I've encountered some sites that sold some (not all) Lawn Fawn products for 25-30% off.  I even purchased the new Best Pun Ever die set for less than $5 (retail price is $20)!  Yes, this was a rare occurrence, but I got lucky on that one.  

So, recently (today) a friend of mine told me that Lawn Fawn dies are on sale at Joann.com for 40% off.  What a deal, right?  Yes -- hurry and check it out if you're a Lawn Fawn fan.  I'm not sure how long the sale will last.  However, while digging a little deeper, I noticed that Joann's marks up the retail price for Lawn Fawn products.  For example, the retail price for the Best Pun Ever die set is $21.49 on Joann.com.  So the sale price ($12.89) is really just 36% off the MSRP.  I know it's not a huge difference and it's still a deal at the end of the day.  I've noticed other sites that "temporarily" mark up the retail price so it looks like the sale is a bigger deal than reality... I just think it's important to keep track of the items you're purchasing, especially when shopping online.  Remember that old Latin saying?  "Caveat Emptor" = Let the Buyer Beware.  I bet my Latin teacher would be proud of me for figuring out a way to weave that into this post.

All in all, this process is very similar to Bargain Hunter game... you want to get a "deal" but keep track of the prices for the products you're planning to purchase.  Then again, some sales happen so quickly where you blink and the item's gone.  Blitsy and Simon Says Stamp have some awesome sales and deals... but you have to act fast on those sales.

That said, I know I'm doing my part to keep this fun industry and awesome manufacturers in business with my crafter spending habits. Haha. Happy Shopping!


Tuesday, May 12, 2015

"New" Product Tuesday: Bokeh Watercolor technique featuring Mama Elephant Stamps

Hello!

Happy Tuesday!  Today I had a ton of fun experimenting with watercolors, pigment ink and a new Mama Elephant "Up and Away" stamp and die set (well, new to me that is).  I created two cards.  Yes, two!!  I had so much fun making the first one... so I decided to make a second card since all my supplies were out.  These would make great baby cards.  I have several friends who are expecting babies in the next few months.  Some know the gender and others are keeping it a surprise.


I really wanted to make a watercolor background and I've been intrigued by the Bokeh effect that I've seen on Instagram and in YouTube videos.  This was so much easier to do than I expected!

Materials:

  • Kraft Card Stock: 4.25"W x 11"H, scored at 5.5" mark
  • Pink and Blue Card Stock: 4"W x 5.25"H
  • White Card Stock: 3.75"W x 5"H
  • Watercolor Paper: 4"W x 5"H, then trim down to 3.5"W x 4.75"H
  • Mama Elephant Up and Away Stamp and Die Sets
  • Yellow Baker's Twine
  • Spellbinders Back to Basics Tag Die
  • Homemade Circle Stencil
  • Hero Arts Unicorn Pigment Ink and Soft Granite Shadow Ink
  • Ranger Distress Inks:
    • For the Pink Card: Picked Raspberry, Dried Marigold, Squeezed Lemonade
    • For the Blue Card: Salty Ocean, Tumbled Glass, Squeezed Lemonade
  • Adhesive
Directions:
  • Start with all the watercoloring... this way you can let your watercolor background dry naturally.  
  • Tape the watercolor paper to a hard surface using painter's tape or washi tape.  I used an art board (similar to the back of a clipboard).  The water tends to warp the paper, so having it taped down helps keep the paint in place.  Apply a clear coat of water using a clean brush over the entire surface.
  • Spread the distress inks on an acrylic block.  Using a paintbursh, gradually add each of the colors to the wet watercolor paper.  I like to start with the lighter color and go darker.  Since I was using three different colors... I went in rainbow order.  Just because :-)
  • Here's a picture... sorry the lighting isn't that good

  • Once the background has dried, use the pigment ink and a circle stencil to apply the Bokeh effect.  I didn't have a stencil, so I made my own using a sheet of plastic and various sized circle dies from Sizzix.

  • Use different degrees of pressure when applying the dots.  I like the small ones to be the most visible so I used more pressure there.  Here's what it looks like.  Once it dries, the pigment ink lightens up a little, so don't be afraid to push hard.  
  • While all that was drying, I colored the rabbit from the stamp set using copic markers.  I used C00, N0 and N2 on the main body and accented it with R20 in the ears, cheeks and feet.  I used R20 and R22 for the pink flower and Y000 and Y21 for the yellow flower.
  • Die cut the rabbit and fussy cut the flower.
  • Stamp the sentiment on a white tag (I used a Spellbinders die to cut out this tag).
  • Tie some twine on the end of the tag
  • Cut all the paper down to size and adhere each layer.  Add the sentiment, rabbit and flower to the front using foam adhesive.
Here are the two cards: 


Enjoy and have a GREAT day!

Tuesday, May 5, 2015

"New" Product Tuesday: Hand-lettering Tools

Hi all,

Happy Tuesday.  Happy Cinco de Mayo.  Happy day after Star Wars Day.  Happy May!!  I'm traveling this week (guess where?) and unfortunately my craft supplies did not come with me.  So, I'm improvising today's post a bit.  This past weekend, I attended an amazing hand-lettering workshop at The Makery Craft Company in Anaheim, CA taught by Kelly from Letter Sparrow.  Luckily, I had a few of my new hand-lettering tools in my bag.

I figured it would be fun to practice some hand-lettering techniques.  First let me preface this with... this weekend was my first attempt at "hand lettering" so I still have a lot to learn.  I'm also a lefty which makes things a bit more difficult, but I'm always up for a challenge!  I didn't make a card.  Instead I just doodled on some scrap paper that I found (i.e. construction paper that is probably 30 years old).


It's fun to create stuff with just a simple No. 2 pencil, eraser, ruler and black & white ink pens.  Here are the materials I used:

  • 30 year old black construction paper and white card stock. Note: if you use regular black card stock, that would be MUCH better.  
  • Dixon Ticonderoga No. 2 Pencil (remember these from our good old SAT days?)
  • Pentel Hi-Polymer Eraser
  • Standard ruler (found this one in my old desk drawer)
  • Sakura Pigma Graphic Ink Pen #1
  • Uni-ball Signo Broad Pigment Ink Pen in White


I made two different sketches.  One with black ink on white paper and the other with white ink on black paper.  Below is the white with black pen version.  I'm not sure I like this layout... feels a little busy in the center.  So, I tried out the white ink on black paper to see how that worked and I think that turned out better.


Anyhow, the directions are pretty straight forward for this:

  • Sketch your layout in pencil and lightly write the letters and words
  • Go over the letters in black (or white) pen
  • Add flourishes and patterns (hearts, etc...)
  • Erase the pencil marks
Pretty simple right?  Definitely requires a lot more practice, but it's very fun.  No special tools or materials.  Just pen(cil) and paper.  Have fun!


Sunday, May 3, 2015

Happy Birthday, Jeremy - featuring Simon Says Stamp

Hello everyone,

Happy May!  Is it really May already?  Crazy!  Well, continuing with the family birthday theme, today is my nephew's birthday.  I cannot believe he's already 14 years old AND he's 6' tall.  It feels like just yesterday when he was a little toddler who drooled over everything he touched... literally.  He wore a permanent bib around his neck.  Haha!  He was (and still is) an extremely energetic kid who ran all over the place.  After spending an hour with him, I would find myself in desperate need for a nap.  I remember he used to ask my brother, "Why does Gu Gu* sleep so much?  She's ALWAYS sleeping!"

* 'Gu Gu' means 'aunt' in Chinese.

Anyhow, now he's grown into a very handsome, nice, tech savvy young man who is an amazing tennis and hockey player.  He loves red and black (or so I think because he's always wearing those colors)... so I decided to incorporate those themes into this card.


Materials:

Directions:
  • Stamp "MAKE A WISH" in Versamark Ink and heat emboss with Liquid Platinum Embossing powder
  • Stamp "It's your Birthday" in black ink underneath
  • Finally, stamp "YAY!" in red ink underneath that
  • Cut this stamped piece to a 3"x3" square
  • Using the stitched square dies, cut a piece of black yardstick.  This will be the outer frame/outline of the stamped square
  • Also use that same square die and cut a window in the red/white patterned paper.
  • Adhere all the layers to the Kraft card insert (not the folded card)
  • Punch three holes in the bottom right corner and add the three brads.
  • Glue this entire piece to the folded card.
Yay!  Happy Birthday, Jeremy!  Make a Wish!